Configuring Columns in the Administration Console
You can customize and organize the columns displayed for each node in the Workflow Administration Console.
To show or hide columns
- In the Console Pane, select the node whose columns you want to configure.
- Select View from the main menu.
- Click Select Columns.
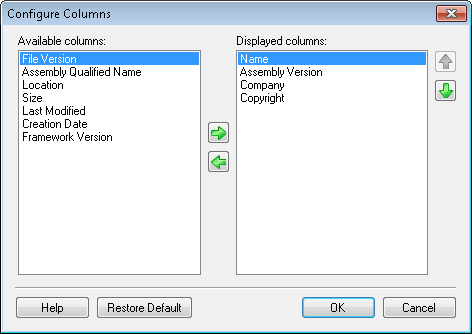
- To show a column, select a column name in the Available columns section of the
 Configuring Columns dialog box. Click the green arrow pointing to the right
  .
. - To hide a column, select a column name in the Displayed columns section, and click the green arrow pointing to the left
 .
. - Click OK.
To reorder columns
- In the Console Pane, select the node whose columns you want to configure.
- Select View from the main menu.
- Click Select Columns.
- In the Configuring Columns dialog box, select a column name in the Displayed columns section.
- Click the green up arrow
 to move that column to the left in the display. Click the green down arrow
  to move that column to the right in the display.
 - Click OK.
Note: You can also reorder columns by clicking on the name of a column in the Workflow Administration Console and dragging it to a new position. As you drag the column, the blue insertion bar indicates where it will be inserted.
To revert to the default column layout
- In the Console Pane, select the node whose columns you want to restore to their default layout.
- Select View from the main menu.
- Click Select Columns.
- In the Configuring Columns dialog box, click Restore Default.
- Click OK.